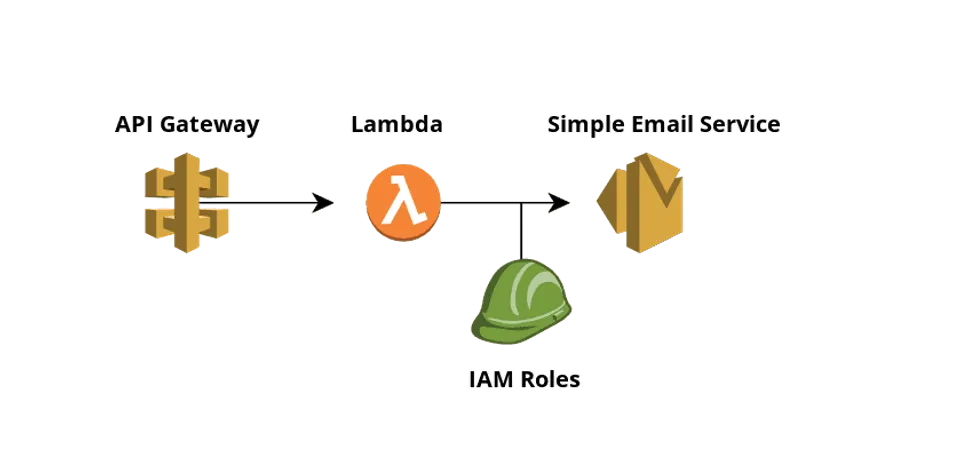
a diagram of what we will be building
This is part 1, of a 2 part series on creating a contact form for your Gatsby powered blog using AWS. The first part covers setting up the backend, using Amazon web services for creating and executing a lambda function, and sending the form data via email.
Part 2 of this series, will discuss the front-end code for validating and submitting form data. You can see a finished version of all this on the contact page.
Note: While this post references GatsbyJS, you can use this with any Static Site Generator, such as Jekyll or Hugo.
There are 4 steps to getting the backend portion working:
- Create a Node.js function using AWS Lambda
- Adjust IAM roles so they can send email
- Create a public endpoint using API Gateway
- Confirm your email address with Simple Email Service
Lambda function
Go to your AWS Lambda dashboard and click the Create Function button. Choose Author from scratch.
Basic information
Type in a function name to identify your function like contact-form and pick Node.js 10.x from the runtime menu. In the permissions section leave the Create a new role with basic Lambda permissions radio button checked, and click the Create function button. Wait a few seconds while everything is created on the server.
Function code
- Copy this code snippet, change
your@email.addressto where you want the emails sent, and paste it as the contents ofindex.jsin the online editor.
const AWS = require("aws-sdk");
const ses = new AWS.SES();

const RECEIVER = "your@email.address";
const SENDER = "your@email.address";
const charset = "UTF-8";

exports.handler = (event, context) => {
  const { name, email, question } = event;
  const params = {
    Source: SENDER,
    Destination: {
      ToAddresses: [RECEIVER],
    },
    Message: {
      Body: {
        Text: {
          Data: `name: ${name}\nemail: ${email}\nquestion: ${question}`,
          Charset: charset,
        },
      },
      Subject: {
        Data: `Message from ${name}`,
        Charset: charset,
      },
    },
  };

  ses.sendEmail(params, (err) => {
    if (err) {
      context.fail(err.stack, "Internal error!");
    } else {
      context.done(null, "Email sent");
    }
  });
};
Click Save and then click the Test button.
In the test event modal that opens up, type in an Event Name like ContactForm and Leave the default test event JSON data provided and click the Create button.
This is a simple example to get you started quickly. You can extend this Lambda to include HTML emails, other form elements like select boxes, and multiple emails. Messages can also be sent via Slack.
IAM role updates
Now open the IAM console and find the newly created user role under the Roles section. Click on the link in the policy name area and then click the Edit Policy button. In the JSON tab, add the following object to the Statement array which gives your new role the ability to send emails using SES. Your role should already have a few log related permissions listed.
{
    "Version": "2012-10-17",
    "Statement": [
      {
          "Sid": "VisualEditor2",
          "Effect": "Allow",
          "Action": "ses:SendEmail",
          "Resource": "*"
      },
      ...
    ]
}
Click on Review Policy and Save Changes
API Gateway
Next let’s create an API gateway. This will serve as a public location where we can POST our form data to, which will in turn call the Lambda function.
Open the API Gateway console and click the Create API button. Choose Rest, New API and give your new API a name and a description, then click the Create API button.
In the Resources column, click the Actions button and select Create Method, change the method to POST in the drop down menu, and click the Checkmark icon.
In the POST - Setup section, choose Lambda Function as your Integration type, and in the Lambda Function input box start typing the name of your new function name from above, which should autocomplete.
Click Save and Confirm the creation of the API.
Now from the same Actions menu, choose Enable CORS and choose Enable CORS and replace existing CORS headers, and confirm changes. You should now see both OPTIONS and POST listed as resources.
Now click on the Actions button and choose Deploy API. You can pick an existing Deployment stage or create a new one, like prod for example, and click the Deploy button.
Copy your new Invoke URL shown and save it for later use. This is where we will POST our form data to in the second part of this tutorial.
SES (Simple Email Service)
Finally let’s tell the AWS Simple Email Service service to trust the email address you used in your Lambda function above, so that it can be used to send emails. If you skip this step, you’ll notice the emails fail to go through.
Open the SES console and choose the Email Addresses section. Click the Verify New Email Address button and type in your@email.address from the above code snippet and click the Verify This Email Address button. Amazon will send you an email and you’ll confirm that you own that address. It can take a few minutes to receive the ping email from AWS.
Woohoo! You’re now ready to call your new endpoint from your front-end code in Gatsby. In the next blog post I’ll show you how to do just that.
Some limitations to be aware of
AWS sets forth some caps on the resources you can use for calling the RESTful Gateway APIs, and on sending emails via SES. Read more about how AWS may throttle API requests and about Amazon SES limits. Mainly there is a max of 50 recipients per individual message sent, and those messages can’t exceed 10 MB each. You’ll probably not hit those limits anytime soon.